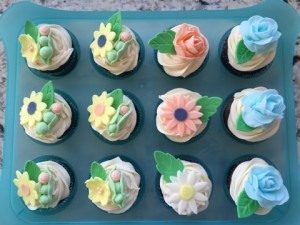
This past weekend, I made cupcakes for my sister-in-law’s baby shower. I wanted to make something really special for them… and when my sister-in-law requested cupcakes, I figured I would try using fondant to make some cute decorations. On pinterest, I saw a cute idea for “baby in a pea pod” cupcakes… and thought that might be something cool to add as decoration to the cupcakes. Since the shower venue was in a beautiful garden, I thought that fondant flowers would work well with the theme.
In the end, I made about 4 dozen cupcakes, and used pre-made Wilton fondant for the decoration: the Wilton Pastel Colors Fondant Pack (about $12) was the basis for most of the flowers and the “baby in a pea pod” – but I also used Wilton Shape-N-Amaze White Edible Decorating Dough (about $7) and Wilton Shape-N-Amaze Natural/Beige Edible Decorating Dough to make the skin tone for the baby’s head. I used the leftover white and “natural/beige” (which actually looked more like orange) edible decorating dough to make white and orange daisies, as well as orange roses. I tinted the leftover white dough with green food coloring to make the leaves. I also tinted some of the dough a dark blue to make the little blue centers for some of the daisies. You can buy fondant and edible decorating dough online – but since I didn’t have time to wait, I just went across the street to Party City and bought it there (they had a pretty good selection). Michael’s or other craft stores should also have a good selection of pre-made fondant and edible decorating dough. You can always make your own fondant… but it’s already quite a bit of work (time wise) to roll out and cut, then make cupcakes and frosting… so I just go for the pre-made fondant to save time.
Although it looks really difficult, it’s actually quite easy to make fondant flowers. Most of the flowers pictured here were made with cookie cutter shapes – you just roll out the fondant or the edible decorating dough, then cut with the cutters – and voila, a flower! The roses required a bit more work (and used up a lot more fondant) – but I think having a few roses in the mix was nice. See below for technique and instructions for the baby in a pea pod and the flowers/roses.
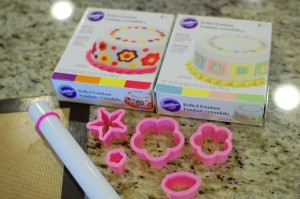
You don’t have to have a bunch of fondant decorating tools – in reality all you need is a silicone mat (silicone cookie sheet liner is fine), a small rolling pin, and some flower shaped cookie cutters… but I found it helpful to have the Wilton Gum Paste and Fondant Student Kit. I also like the Wilton Fondant 9 Inch Rolling Pin)… this has rubber bands you can put on the end which help you roll out your fondant to a specified thickness. But if you are limited in supplies/equipment, you could probably roll out pre-made fondant on a smooth counter top with the side of a clean wine bottle.
I used the following ingredients:

Useful fondant tools and cutters & Wilton Pastel colors fondant pack (upper right)
- Wilton Pastel Colors Fondant Pack
- Wilton Shape-N-Amaze White Edible Decorating Dough
- Wilton Shape-N-Amaze Natural/Beige Edible Decorating Dough
Hardware needed:
- silicone mat
- small rolling pin ( I like the Wilton Fondant 9 Inch Rolling Pin)
- small flower and leaf shaped cookie cutters
- paste food coloring (I like the Wilton Paste Color set) – you might only need a little bit
- I used a lot of the flower/leaf shaped cutters and tools from the Wilton Gum Paste and Fondant Student Kit (but it’s not essential)
1. First, make “pea pod babies”: Roll out Wilton Green (Pastel) fondant to 1/16″ thickness. (I find it easiest to do this on a silicone baking sheet with my Wilton Fondant 9 Inch Rolling Pin – it has rubber end bands that you can use to make sure you have the appropriate even thickness.) Using a round biscuit cutter (diameter of the circle = length of pea pod that you want), cut out several 2-3″ diameter circles. Use a sharp knife to cut off some of the circle sides so that you end up with more of a pointy oval. Use a little pressure from a round object (back of spoon or Wilton Fondant Tool - the “ruffle tool” [plastic stick with a ball on the end]) to roll the fondant from the center outward to thin the edges a bit. With the amount of pastel green I got from the Wilton Pastel Colors fondant pack, I was able to make about 24 pea pod babies.)
2. Knead a small amount of the white and beige edible decorating dough together. Add more natural/beige (it actually looked orange to me) or more white depending on how light or dark you would like the skin tone to be. If you need to go darker, add a bit of brown Wilton Paste Color (just a tiny dab at a time) until you have the desired shade. Portion your skin colored dough into pea sized lumps, and roll between the palms of your hands to create round spheres (make 1 per pea pod). This will become the baby’s head.
Do the same thing with the pastel green fondant – make round pea sized spheres (the same size as the skin tone ones), and make 2 per pea pod.
3. Brush the center of the green pea pod ovals with a little bit of water. Place the 3 round balls vertically into your green ovals (skin tone + green + green), and pinch up the short sides of the oval to come up the side of the peas. Pinch the top and the bottom edges of the pea pod oval to form a little points. Use the pointy end of a toothpick to draw a happy face: poke two holes for the eyes, poke a hole for the nose, and gently scratch in a smiling mouth.
4. Using fondant cutters, pie crust cutters, or even small cookie cutters, use the remaining pastel fondant to create a variety of flowers and leaves. If you would like to see a step-by-step for flowers, see my tutorial on making fondant flowers and roses. My Wilton Gum Paste and Fondant Student Kit came with a variety of flower shapes that I used to make roses, daisies, leaves, and so forth. I used the smallest ring from my Wilton Set of 3 Round Cut Outs to create the dark blue, orange, and yellow centers for some of my daisies. I think the Wilton Pastel multipack is a good value for making fondant decorations for these kind of cupcakes because you can use the green for leaves/pea pods, and the blue, pink, and yellow to make flowers. Because this was a baby shower for a boy, I didn’t use the pink – I’ll save that pink pack (unopened) for something else. If you are doing a baby shower for a girl, you might want to do the same – use the pink, but save the blue for another use. As long as they remain unopened, the fondant will remain fresh and soft for awhile.
5. After you frost your cupcakes (a simple swirl using a Wilton No.2D Decorating Tip usually looks nice), arrange your pea pod babies and flowers/leaves on top of the cupcakes. Don’t overdo it – one flower and one leaf along side a baby pea pod is usually enough.
6. For a bit of variety, I wanted to make some rose decorated cupcakes in blue (since the baby shower was for a boy) – pink roses would be nice for a girl, or yellow if you aren’t sure if it’s a boy or a girl. If you would like instructions on how to make fondant roses, see my tutorial. For the roses pictured below, I actually used 3 layers of petals for a really full rose (one layer of petals is good for making a bud rose). I also didn’t bother with a green calyx. (After steps 1-10 in my fondant rose tutorial, I repeated steps 3-10 twice – so that you would cut out 3 flowers to make petals – all to be layered to make one really full rose.)
7. I also used the leftover natural/beige edible decorating dough to make “peach” colored roses and daisies, and I used the leftover white decorating dough to make white daisies. Small circles were cut out of contrasting colors to make the daisy centers (glue the small circles to the center of the flower with a dab of water – it will stick once dry). I tinted green the leftover white decorating dough with my green Wilton Paste Color so that I could roll out and create edible leaves (I had used up all the pastel green to make baby pea pods).
You can use this technique and these ideas to make flower cupcakes for other events – not just baby showers. If you don’t make pea pod babies, then you can just use the pastel green from the Wilton Pastel fondant pack to make leaves, then use the yellow, pink, and blue to make flowers (and you probably don’t need to buy white or any other colors unless you want to). I find it much easier to make the fondant decorations ahead of time – leave them out to dry (cover with a paper towel). Don’t store them in a sealed plastic container because then they will get soft and “gummy”. The night before your event, bake your cupcakes. The morning of your event (if possible), frost your cupcakes and add the decorations. Enjoy!


These cupcakes are really cute. I had no idea that it was that easy to make fondant flowers. I will have to keep this in mind for my soon to be sister-in-law’s bridal shower. Thanks for sharing!
You’re welcome!